


Hi everyone,
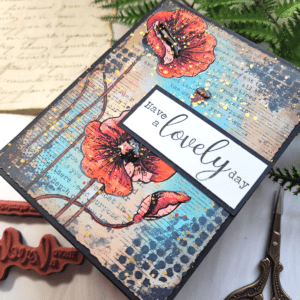
Have you seen the March Background of the Month stamp yet? All I can say is O.M.G.! It’s absolutely stunning! Today I’m going to share an easy way to add color to compliment a detailed background like this one! But first, let’s look at the stamp design!

There is a lot going on with this stamp that gives it a vintage, mixed media ‘Ish vibe! My thought was to add subtle color to the background to compliment all that juicy detail, and then add a pop of bright color to the flowers!
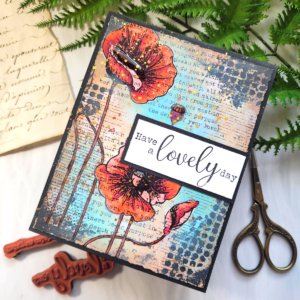
First step was to stamp the background in permanent black ink. Permanent black ink doesn’t bleed when you color or use water over it. Next, I stamped the image again on another sheet of white cardstock and fussy cut the flowers to use as a mask because I wanted to protect the flowers when ink blending the background. Using Distress Oxide inks in Salvaged Patina, Tea Die, and Vintage Photo, I created a subtle backdrop of color behind the flowers that complimented the beautiful details in the stamp. Then I splattered water spots over the top for that vintage look that only comes with distress inks!
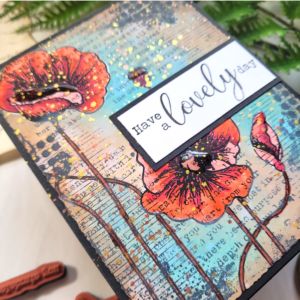
When ink blending was done, I removed the masks from the flowers and colored them using Copic markers in R05, R24, and R69. An alternative to coloring is to keep the flowers white against that backdrop of color! That would be beautiful! But I wanted a bright pop of color to the flowers for this card, so I colored them. Once my coloring was done, I went over the entire card panel with gold metallic splatters. I trimmed the edges of the card panel using my deckled edge paper trimmer and adhered it over a black 5.5×4.25 card base. The finishing touch was glossy accents over the flower centers and a sentiment from Every Single Day 2018 Sentiment Kit.
What I love about Unity stamps is the amount of detail in them! I’ve never seen more detailed stamps than what Unity creates! Making a card is so much easier when the stamp is already detailed and gorgeous! And you can subscribe to the monthly membership kit and get this stamp at a discount every month before anyone else gets it! Visit here for details.
Thanks for stopping by!


